
Install Ansible Automation Platform on OpenShift Local
- Introduction
- Requirements
- OpenShift Crash Course
- Part 1 - Install OpenShift
- Part 2 - Install Operator
- Part 3 - Install Automation Controller
- Part 4 - Install Automation Hub
- Scaling
- Storage
- Load Balancer
- Topology
- Containers
- Delete Operator, Controller and Hub
- Automation Analytics
- References
Introduction
Red Hat Ansible Automation Platform (AAP) is now supported on the Red Hat OpenShift platform. In order to get your hands dirty with the installation process and gain experience, follow these steps to install OpenShift and Ansible Automation Platform (AAP) on your laptop or workstation.
Note that some features are currently not available on the OpenShift platform:
- Automation Services Catalog is currently not available
- Automation services catalog is a service within the Red Hat Ansible Automation Platform that allows customers to organize and govern product catalog sources on Ansible across various environments.
- Automation Services Catalog: https://www.ansible.com/resources/webinars-training/automation-services-catalog
- More information can be found here.
- Automation Mesh is currently not available
Even with these current drawbacks, it is still a great direction to consider installing AAP on your OpenShift platform. The missing features will be added in upcoming releases and if your organization already has experience with OpenShift and containers then it’s something to seriously consider instead of the traditional installation on virtual machines.
Instead of the traditional installation method using the tar ball and running setup.sh script, the situation is very different On OpenShift. We will be leveraging Operators that greatly simplifies the installation process. For more information on operators, read below.
Requirements
To run Red Hat OpenShift on your laptop we will need to use Red Hat OpenShift Local (previously known as CodeReady Containers) that greatly simplifies OpenShift architecture to a single virtual machine running on your laptop. The virtual machine is managed through the included crc binary and OpenShift is managed through the typical oc command line tool or its GUI interface.
- Uses
OpenShift Container Runtimedefault preset as required by Ansible - Resources
- Minimum 4 physical CPU cores; 9 GB of free memory
- Recommended 5 vCPUs and 15 GB RAM (to accommodate for Ansible)
- 35 GB of storage
- Operating Systems
- Microsoft Windows: Windows 10 Fall Creators Update (version 1709) or newer
- MacOS: MacOS 11 Big Sur or later
- Linux: Red Hat Enterprise Linux 7.5, CentOS 7.5, or latest two stable Fedora releases
- Uses non-customizable cluster settings
- Requires the
*.crc.testingdomain. - Requires the
172address range for internal cluster communication. This can cause issues when, for example, a proxy is run in the same address space.
- Requires the
OpenShift Crash Course
Historically, Ansible Automation Platform has been installed on VMs. So it’s necessary to introduce some basic OpenShift terminology. This certainly is not trying to cover everything but rather give the reader some understanding of the new landscape in OpenShift. We need to become familiar with these concepts in order to install, manage, and upgrade the Ansible Automation Platform.
Platform Management
Achieved through the use of the following major concepts:
OpenShift Container Platformis based on Kubernetes and therefore shares the same technology however it includes enterprise-ready enhancements such as hybrid cloud deployments, integrated Red Hat technology, and an open source development model.Usersare Kubernetes objects that represents an actor which may be granted permissions in the systemProjectis a Kubernetes namespace with additional annotations, and manages access to resources for regular users. A project allows a community of users to organize and manage their content in isolation from other communities. Users must be given access to projects by administrators, or if allowed to create projects, automatically have access to their own projects. Most objects in the system are scoped by namespace, but some are excepted and have no namespace, including nodes and users. For the purposes of the OpenShift platform,projectandnamespaceare interchangable.Groupsare useful when managing authorization policies to grant permissions to multiple users at once, for example allowing access to objects within a project, versus granting them to users individually. A user can be assigned to one or more groups, each of which represent a certain set of users.Authentication layercan be configured by a cluster administrator to control access and ensure only approved users access the cluster. For users to interact with OpenShift Container Platform, they must first authenticate to the cluster. The authentication layer identifies the user associated with requests to the OpenShift Container Platform API.Authorization layerdetermines whether the identified user has permissions to perform the requested action by following the defined RBACRole-based access control (RBAC)objects such as rules, roles and bindings determine whether a user is allowed to perform a given action within a project.
Container Management
Achieved through the use of the following architectural concepts that has a Kubernetes foundation:
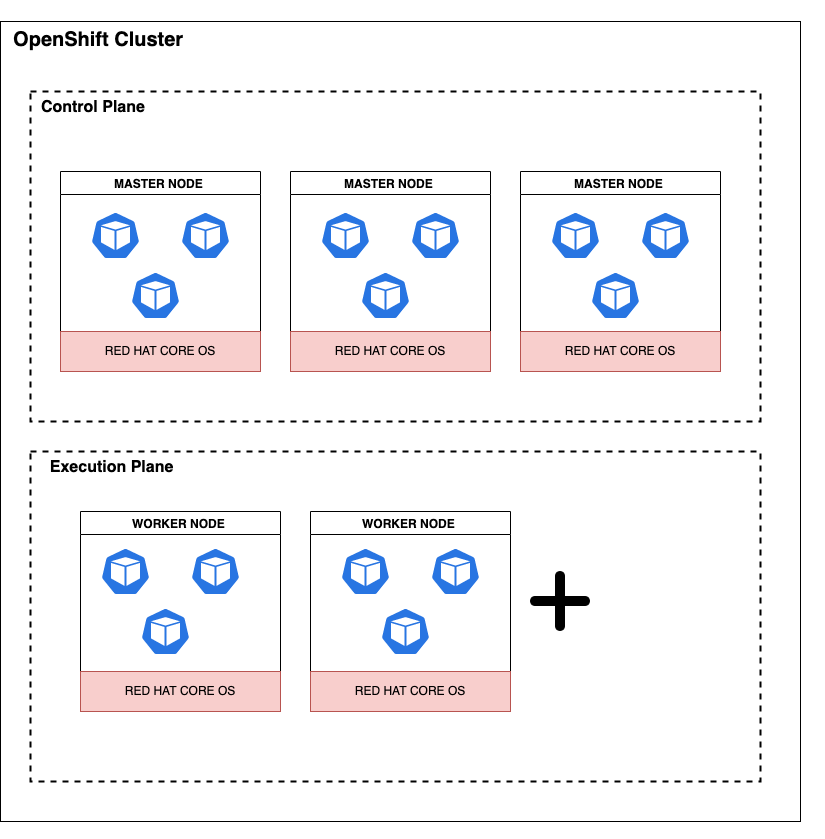
OpenShift Platformrepresents a singlecluster- Each cluster has one or more
nodes, which are virtual or bare-metal machines that provide the runtime environments - A typical cluster contains the following:
control planeis a logical grouping of nodes containing exactly 3master nodesexecution planeis a logical grouping of nodes containing at least 2worker nodes, which handle various workloads- Optional
infra nodesare worker nodes marked with the infra label meant to segregate functionality (such as routing, logging, monitoring) for the purpose of cost savings
- Each node typically runs on
Red Hat Enterprise Linux CoreOS(RHCOS), which is a container optimized operating system - Each node runs one or more
pods - Each pod is an object that is defined, immutable, and runs one or more
containerson one node. Each pod is allocated its own internal IP address, therefore owning its entire port space, and containers within pods can share their local storage and networking. Pods have the following lifecycle:- Pending
- Running, if at least one of its primary containers starts
- Succeeded, if all containers terminated successfully
- Terminated, if at least one container terminated in failure
- Unknown, can occur at any time when state of pod cannot be obtained
- Each pod is configured with specific
CPUandMemoryto ensure proper performance.- CPU is measured in units called
millicores. Each node in a cluster inspects the operating system to determine the amount of CPU cores on the node, then multiplies that value by 1000 to express its total capacity. For example, if a node has 2 cores, the node’s CPU capacity would be represented as 2000m. If you wanted to use 1/10 of a single core, it would be represented as 100m. - Memory is measured in
bytes. In addition, it may be used with SI suffices (E, P, T, G, M, K) or their power-of-two-equivalents (Ei, Pi, Ti, Gi, Mi, Ki). - More information on memory and cpu resource units in OpenShift can be found here.
- CPU is measured in units called
- Each container represents a basic unit of an OpenShift
applicationthat comprises the application code packaged along with its dependencies, libraries, and binaries - Each container consumes
compute resourcesfrom the node they run on, which are measurable quantities that can be requested, allocated, limited and consumed.
Operations Management
Achieved through the use of:
Operatorsare pieces of software that ease the operational complexity of running another piece of software. They are among the most important components of the OpenShift Container Platform. Operators are the preferred method of packaging, deploying, and managing services on the control plane. They can also provide advantages to applications that users run. They provide the means of monitoring applications, performing health checks, managing over-the-air (OTA) updates, and ensuring that applications remain in your specified state.OperatorHubis a web console for cluster administrators to discover and select Operators to install on their cluster. It is deployed by default in OpenShift Container Platform.- The level of sophistication of the management logic encapsulated within an Operator can vary. This logic is also in general highly dependent on the type of the service represented by the Operator.
Image Management
Achieved through the use of:
Imagesare a packaging format for software, supporting dependencies, and operating system. Images are immutable - they cannot be changed once they are built. If you modify the software running on the image, you must build an entirely new image and replace the old one.- OpenShift Container Platform can build images from your source code, deploy them, and manage their lifecycle. It provides an internal, integrated container
image registrythat can be deployed in your OpenShift Container Platform environment to locally manage images. The image registry will contain all versions of an image.
Secrets Management
Achieved through the use of:
Secretsprovide a mechanism to hold sensitive information such as passwords
Application Delivery Management
Achieved through the use of:
configmapsallow you to decouple configuration from imagesReplicationControllersandReplicaSetsensure a specified number of pods are running at any given timeDeploymentsandDeploymentConfigurationsdefine how to roll out new versions of pods
Logging Management
Achieved through the use of:
Logging subsystemcontains both the OpenShift Elasticsearch Operator and Red Hat OpenShift Logging Operator
Security Management
Achieved through the use of:
Auditingprovides a security-relevant chronological set of records documenting the sequence of activities that have affected the system by individual users, administrators, or other components of the systemCertificatesare used by various components to validate access to the clusterEncrypting datafor your cluster to provide an additional layer of data security.Vulnerability scanningusing the Red Hat Quay Container Security Operator to run vulnerability scans on container images used in active pods on the clusterCompliance checkingusing the Compliance Operator to run compliance scans and recommend remediations for any issues foundFile integrity checkingusing the File Integrity Operator to continually run checks on cluster nodes and provide a log of modified files
Network Management
Achieved through the use of:
- Each pod is allocated an internal IP address. This means that pods can be treated like physical hosts or virtual machines in terms of port allocation, networking, naming, service discovery, load balancing, application configuration, and migration.
- Pods and their containers can network and containers in the same pod share the same network space, but clients outside the cluster do not have networking access. This ensures all containers within the pod behave as if they were on the same host.
routesmake services accessible to clients outside the environment via real-world urlsservicesprovide internal load-balancing and service discovery across pods; apps can talk to each other via services
Storage Management
Achieved through the use of two major storage mechanisms:
Ephemeral storage, as pods and containers are ephemeral or transient in nature and designed for stateless applications.Persistent storage, as stateful applications deployed in containers require persistent storage.Persistent Volumesare pre-provisioned storage frameworks to allow cluster administrators to provision persistent storage. The data inside these volumes can exist beyond the lifecycle of an individual pod.Persistent Volume Claimsare objects that claim a portion of the defined persistent volume. When applications are deployed, OpenShift automatically connects the real storage into the container as specified by the end user. As applications move around in the cluster, the storage automatically follows them. Many different storage types are supported, from raw to block to file, both read-write-once and read-write-many.
Application Management
OpenShift performs health checks on running Applications through the use of probes that are defined with the pod. Probes are powerful ways to increase the reliability and availability of applications in OpenShift. OpenShift includes two types of probes for evaluating the status of applications.
liveness probesdetermine if a container is still running. If the probe fails due to a condition such as a deadlock, it kills the container and the pod then responds based on its restart policy.readiness probesdetermine if a container is ready to accept service requests. If the readiness probe fails for a container, it removes the pod from the list of available service endpoints. After a failure, the probe continues to examine the pod. If the pod becomes available, it adds the pod to the list of available service endpoints.startup probesdetermine whether the application within a container is started. All other probes are disabled until the startup succeeds. If the startup probe does not succeed within a specified time period, it kills the container, and the pod responds based on its restart policy.
Part 1 - Install OpenShift
For the first part, let’s prepare and install OpenShift Local on your laptop.
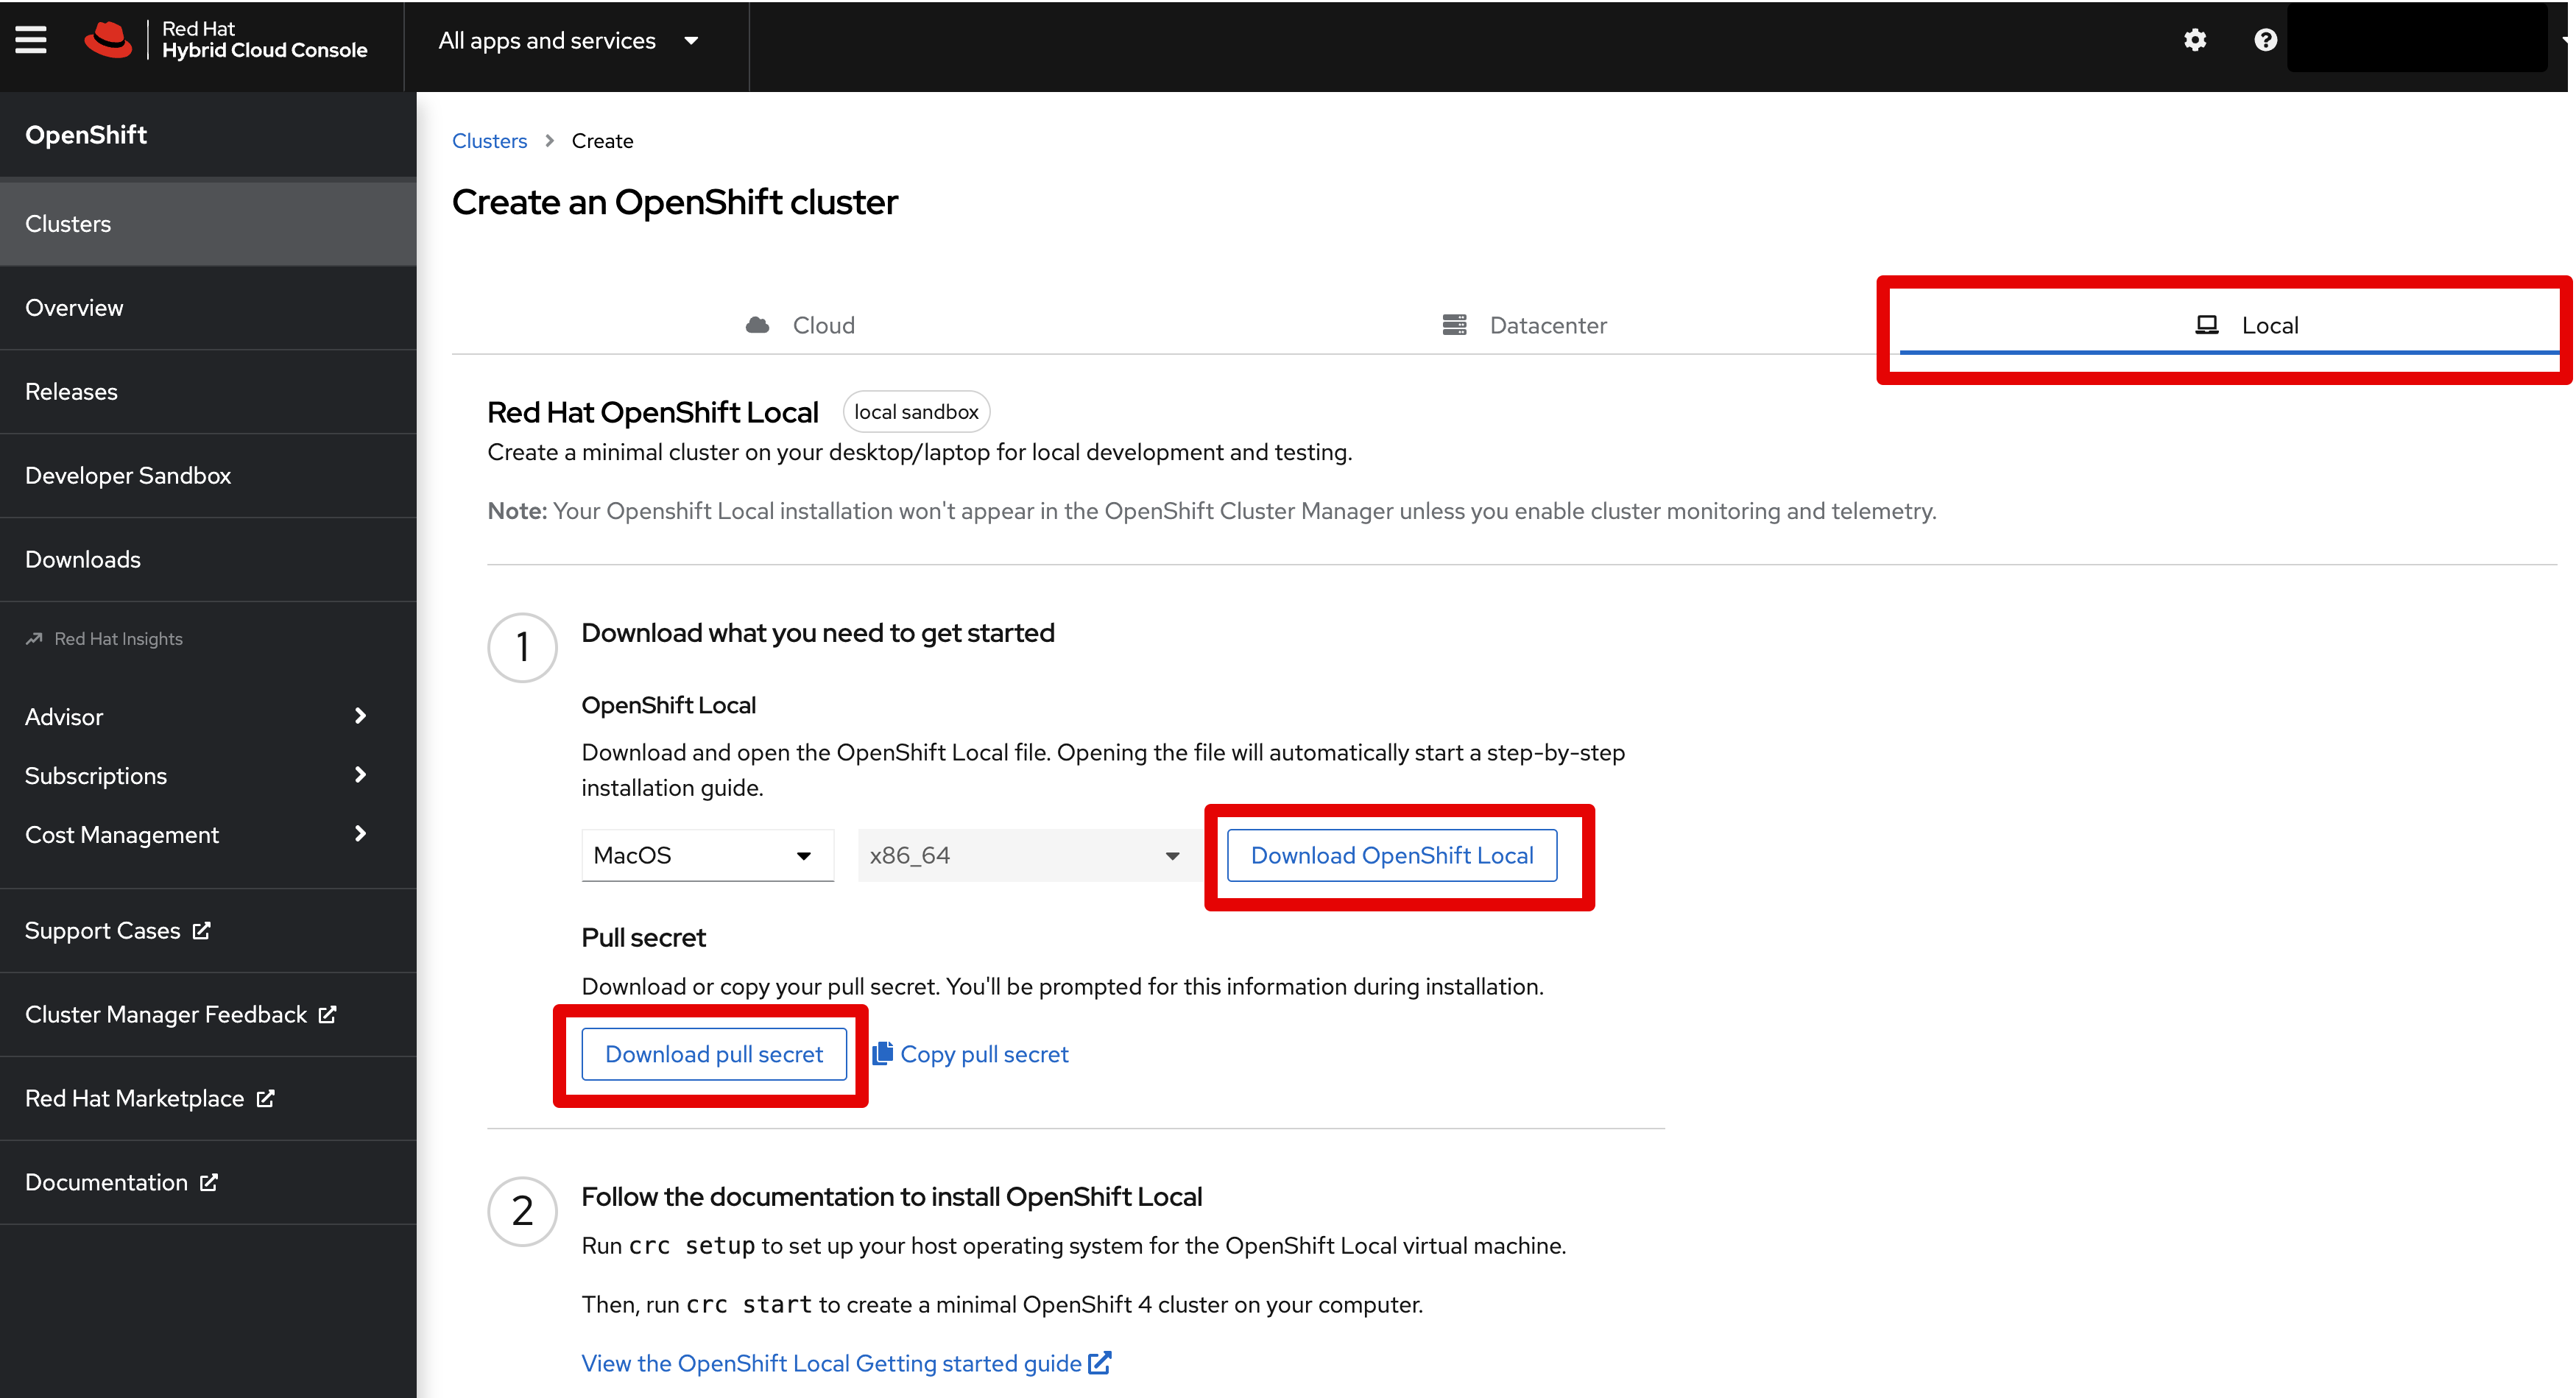
- Navigate to Red Hat Console
- Download the
pull secretto a local file - For Linux laptops:
- Download and extract the
OpenShift Localarchive - Place the binary file to a location in your
$PATH
- Download and extract the
- For Mac laptops:
- Download and open the
OpenShift Localfile to begin the step-by-step installation - Run
crcfrom command line, Mac security will prevent it from running, click OK - Go to System Prefs -> Security -> General and you’ll notice a warning about
crc; clickAllow - Run
crcfrom command line again and window pops up warning again but allowing you to “Open” the app
- Download and open the
- Setup the CRC environment. This will create the ~/.crc directory if it does not already exist.
crc setup - Configure the virtual machine using recommended configuration described above.
- Set the CPUs
crc config set cpus 5 - Set the Memory
crc config set memory 14305 - Set the pull secret:
crc config set pull-secret-file <pull-secret.txt>
- Set the CPUs
- Review configuration settings. We can only configure the resources before we start a new OpenShift cluster. If you wish to change them later, you must first delete the existing cluster and then change the configuration.
crc config view - Start the installation
crc start - Get a cup of coffee!
- When it’s completed, it will provide the web console URL and the credentials for both
developerandkubeadminusers. - Login using command line
- Prepare your environment
eval $(crc oc-env) - Login using
kubeadmincredentialsoc login -u kubeadmin https://api.crc.testing:6443
- Prepare your environment
- Login using web console
crc console
For more details on Red Hat OpenShift Local use the Getting Started Guide.
Part 2 - Install Operator
- Ensure you are logged in using the administrator account
kubeadmin - Navigate within OpenShift web console on the left panel to
Operators -> OperatorHub - In the search field type
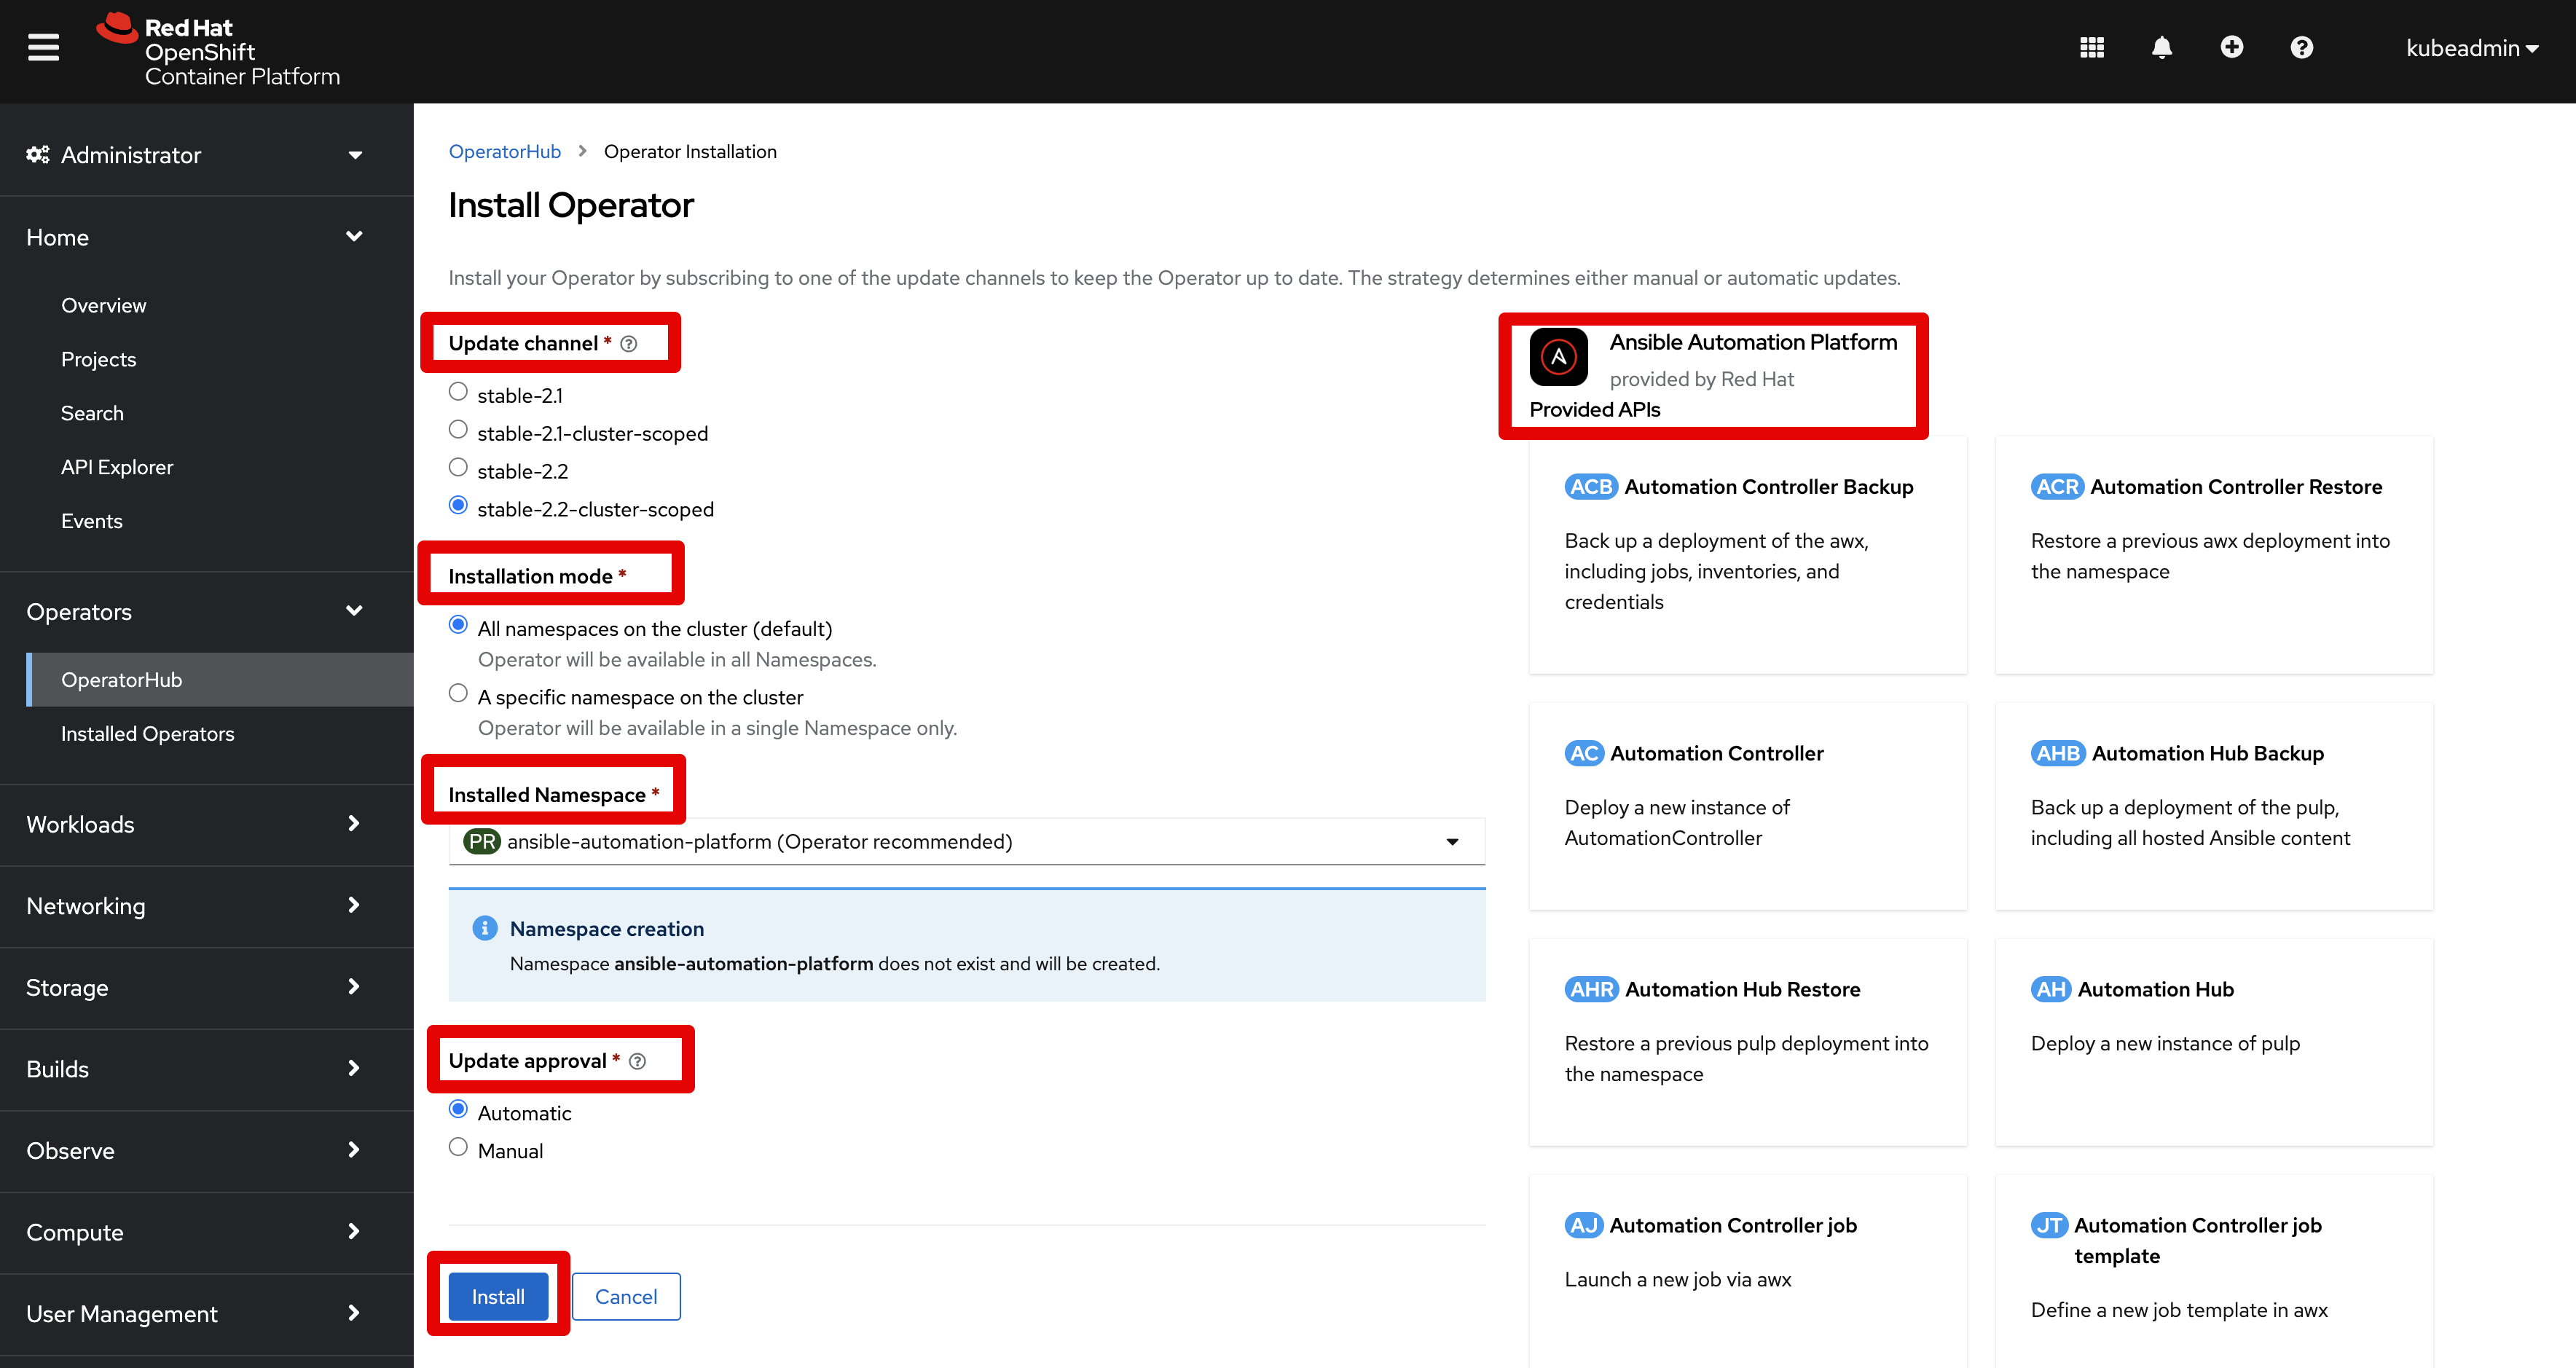
aapto find the Operator - Select the
Ansible Automation PlatformOperator - Select the blue
Installbutton which gives you the following installation options- Update Channel
- Installation Mode
- Installed Namespace - The installation creates a default namespace
ansible-automation-platformand place all objects under that namespace - Update Approval
- Leave the default options and click
Installbutton - Wait for the
Installing Operatormessage to change to
Installed operator - ready for use - You can watch the pods using the following
occommands:
oc get pods -n ansible-automation-platform
Part 3 - Install Automation Controller
By default, when using the Red Hat Ansible Automation Platform Operator to create the Automation Controller, it creates and configures a managed PostgreSQL pod in the same namespace as your Ansible Automation Platform deployment. A user may instead choose to use an external database if they prefer (1) to use a dedicated node to ensure dedicated resources or (2) to manually manage backups, upgrades, or performance tweaks. For the purposes of this article, the assumption is to leverage a managed PostgreSQL instance.
The recommendation is to leverage the defaults using the Operator unless you specifically need it different.
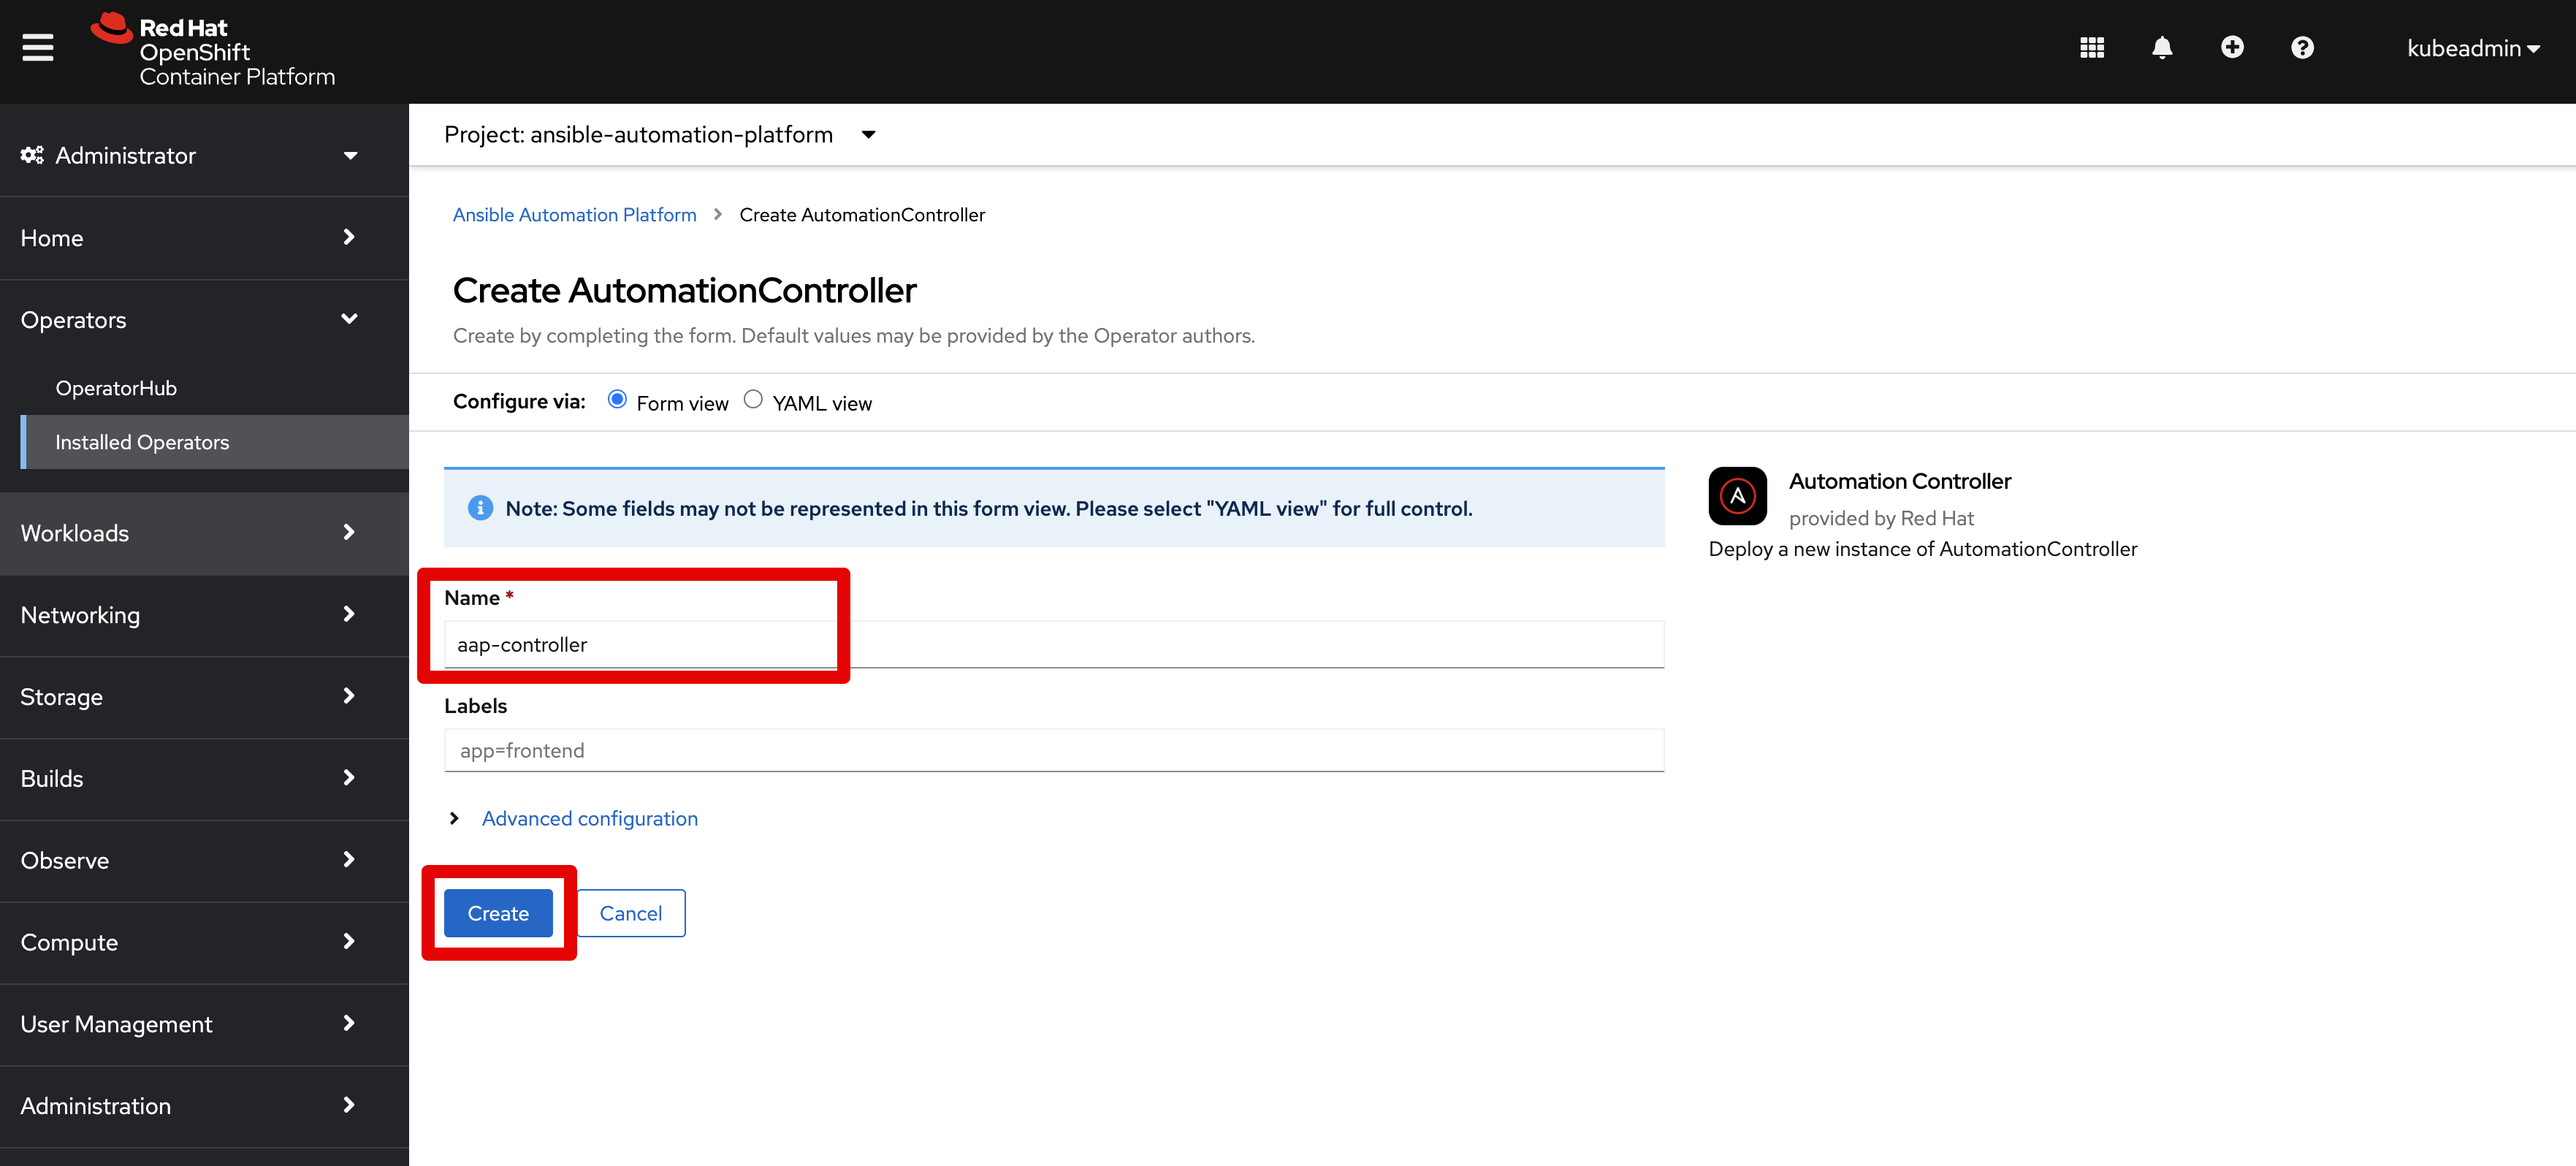
Create Controller
- Ensure you are logged in using the administrator account
kubeadmin - Navigate within OpenShift web console to
Operators -> Installed Operators - Navigate to the
Automation Controllertab - Click the blue button
Create Automation Controlleron the right side - Set the following fields as you wish, leveraging defaults in all other cases
Name- Set a custom name, for exampleaap-controllerReplicas- Defaults to 1 instance of Automation Controller, increase as you wish. For more info see Scaling section.Remove used secrets on instance removal?- Set to true to cleanup everything when you delete an instance of Automation ControllerPreload instance with data upon creation?- Set to false if you do not want the default objects created (such as “Default” organization)Enable persistence for /var/lib/projects directory?- Ignore the Advanced Configuration section, as we will use default values
- Click the blue button
Createto begin creation
You should see the following pods created and running:
aap-controller-565bb7dc58-rmf4z                                   4/4     Running   4             37m
aap-controller-postgres-13-0                                      1/1     Running   0             38m
Login to Controller
Before we can login to the Automation Controller, we need the following items:
- The
adminpassword generated by the Operator - The network
routegenerated by the Operator - Red Hat subscription account credentials
We can get this information using either the OpenShift GUI or via command line.
- Using OpenShift GUI:
- Open the OpenShift console:
crc console - Login using
kubeadminadministrator (if you forgot the kubeadmin password, usecrc setupcommand to display it again) - Navigate to
Networking -> Routes - Ensure the project
ansible-automation-platformis selected - Navigate to the URL shown in the
Locationcolumn and drilldown on it - New browser tab opens up with Ansible
- Open the OpenShift console:
- Using Command Line
- Change current project:
oc project ansible-automation-platform - Get routes:
oc get routes - Use the value under the
HOST/PORTcolumn as the URL for Ansible - Navigate to the URL in your browser
- List secrets for admin accounts:
oc get secrets | grep admin - Get
adminpassword using the following command (replace the secret):oc get secret aap-controller-admin-password -o yaml |grep password:|awk '{print $2}'|base64 -d
- Change current project:
- Login using the
admincredentials - The first time you login, you will need to provide your Red Hat subscription credentials
- Start having fun with Automation Controller
Part 4 - Install Automation Hub
By default, when using the Red Hat Ansible Automation Platform Operator to create the Automation Hub, it creates and configures a managed PostgreSQL pod in the same namespace as your Ansible Automation Platform deployment.
The recommendation is to leverage the defaults using the Operator unless you specifically need it different.
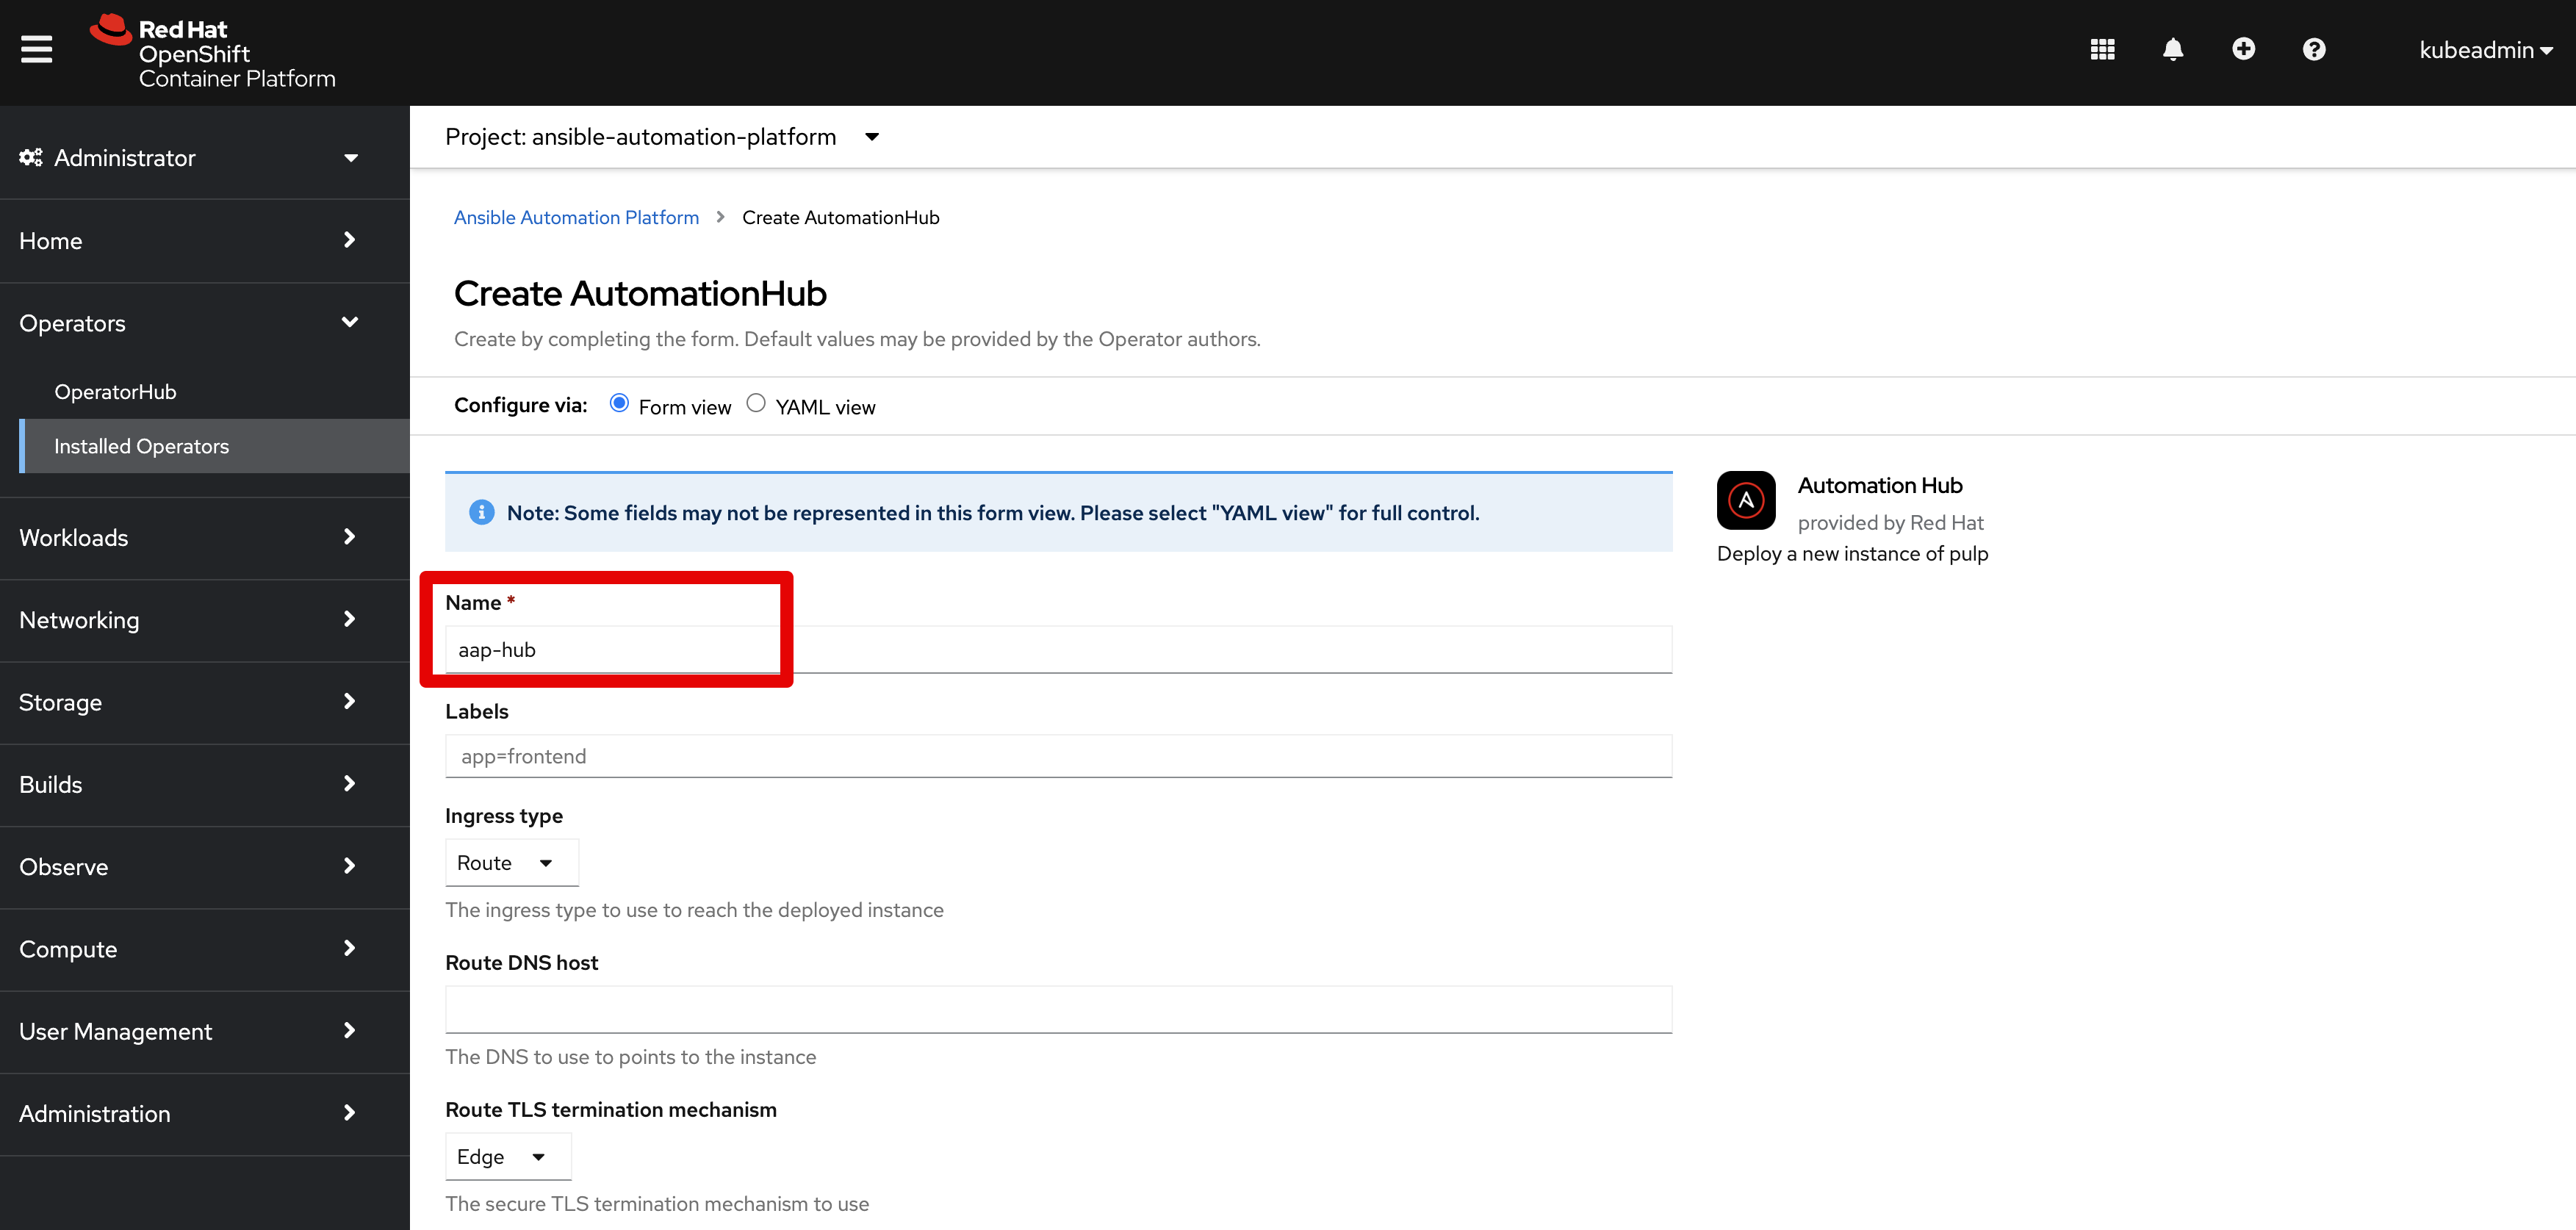
Create Hub
- Ensure you are logged in using the administrator account
kubeadmin - Navigate within OpenShift web console to
Operators -> Installed Operators - Navigate to the
Automation Hubtab - Click the blue button
Create Automation Hubon the right side and set the following fieldsName- Set a custom name, for exampleaap-hubStorage Type- set toFile- Ignore the Advanced Configuration section, as we will use default values
- Click the blue button
Createto begin creation
You should see the following pods created and running:
aap-hub-api-7555475ccd-7qn66                                      1/1     Running   0               8m37s
aap-hub-content-657cbb64bb-4pfc8                                  1/1     Running   0               8m31s
aap-hub-content-657cbb64bb-ssh92                                  1/1     Running   0               8m31s
aap-hub-postgres-13-0                                             1/1     Running   0               9m51s
aap-hub-redis-5b7dcff876-fgsp7                                    1/1     Running   0               9m8s
aap-hub-web-84485b9644-ch27t                                      1/1     Running   3               9m37s
aap-hub-worker-d9c9f86-qcgr2                                      1/1     Running   0               8m28s
aap-hub-worker-d9c9f86-v9sdb                                      1/1     Running   0               8m28s
Login to Hub
Before we can login to the Automation Hub, we need the following items:
- The
adminpassword generated by the Operator - The network
routegenerated by the Operator - Red Hat subscription account credentials
We can get this information using either the OpenShift GUI or via command line.
- Using OpenShift GUI:
- Open the OpenShift console:
crc console - Login using
kubeadminadministrator (if you forgot the kubeadmin password, usecrc setupcommand to display it again) - Navigate to
Networking -> Routes - Ensure the project
ansible-automation-platformis selected - Navigate to the URL shown in the
Locationcolumn and drilldown on it - New browser tab opens up with Ansible
- Open the OpenShift console:
- Using Command Line
- Change current project:
oc project ansible-automation-platform - Get routes:
oc get routes - Use the value under the
HOST/PORTcolumn as the URL for Ansible - Navigate to the URL in your browser
- List secrets for admin accounts:
oc get secrets | grep admin - Get
adminpassword using the following command (replace the secret):oc get secret aap-hub-admin-password -o yaml |grep password:|awk '{print $2}'|base64 -d
- Change current project:
- Login using the
admincredentials - The first time you login, you will need to provide your Red Hat subscription credentials
- Start having fun with Automation Hub
Scaling
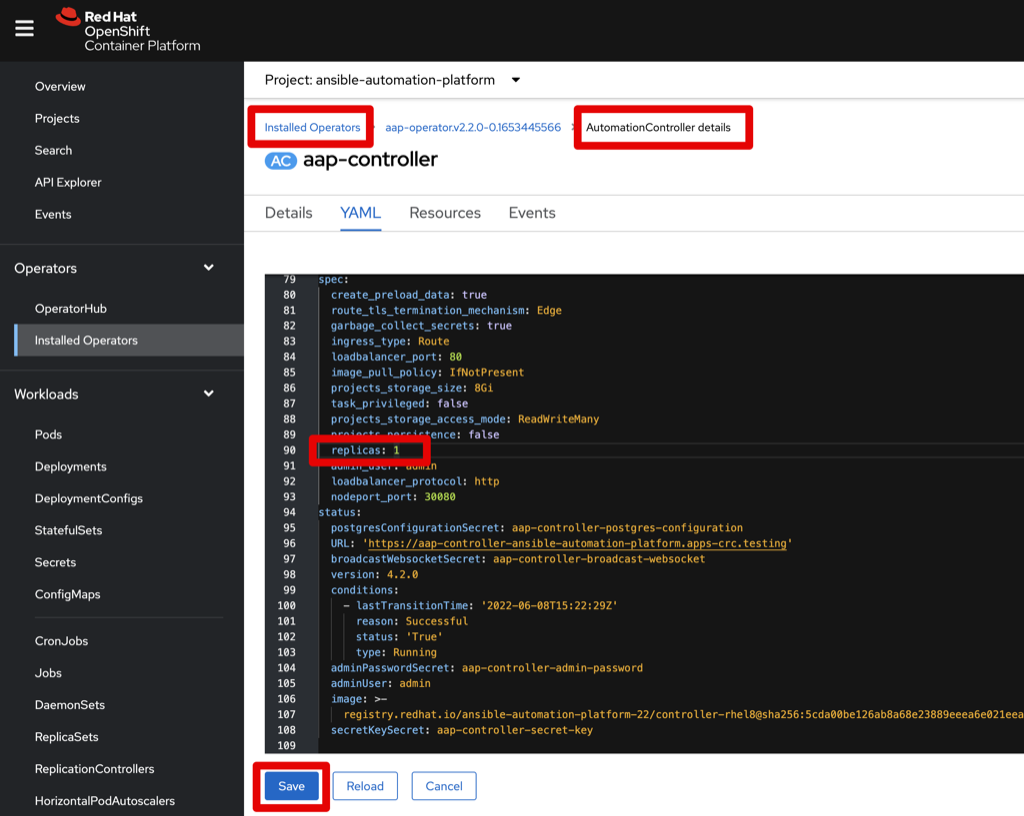
You can scale the Automation Controller up or down by leveraging the Replicas property in the Automation Controller that is managed by the Operator. Do NOT try to change this anywhere else as it currently is not supported. For example, if you try to scale up editing the Deployment then those pods will start but soon terminated as the Operator is managing these pods and believes there should only be 1 replica.
- Navigate to
Operators -> Installed Operator - Select
Ansible Automation Platformoperator - Select the
Automation Controllertab - Click on the 3-dots on the right hand side of the listed Automation Controller
- Click on
Edit Automation Controller - In the YAML, scroll to the
specsection for propertyreplicas - Change the number to scale up or down
- Click blue
Savebutton - Navigate to
Workloads -> Podsand watch the Operator scale up/down your Automation Controller pods
Notice that the Operator will generate unique pod names based on the name you provided the Automation Controller and it will still only create one instance of Postgres pod.
aap-controller-565bb7dc58-kl7dg                                   4/4     Running   1 (10s ago)   2m23s
aap-controller-565bb7dc58-r2bpk                                   4/4     Running   1 (10s ago)   2m23s
aap-controller-565bb7dc58-rmf4z                                   4/4     Running   1 (13s ago)   2m23s
aap-controller-postgres-13-0                                      1/1     Running   0             3m8s
Storage
To view the related storage for Ansible Automation Platform, navigate to Storage -> PersistentVolumeClaims to list the PVCs created to manage data for Automation Controller and Automation Hub.
Within OpenShift you can easily expand persistent volume claims so keep things simple and go with the default sizing options for the PostgreSQL database for the Ansible Automation Platform and expand it later as needed.
Consider using the Volume Expander Operator that is provided by the Red Hat Community of Practice. The purpose of the operator is to expand volumes when they are running out of space. This is achieved by using the volume expansion feature mentioned above.
Load Balancer
Traditionally Ansible Automation Platform architecture includes configuration of a front Load Balancer to help manage the load over a cluster of virtual machine nodes that serve the various requests. In this case AAP on OpenShift is running one or more Automation Controller pods and a single route object has been defined to reach and use those pods. The route object is a load balancer (haproxy) and handles the load using either round robin or least connection methods (depending on how it has been configured, least connection being the default). For more information review the OpenShift online documentation section Networking -> Configuring Routes.
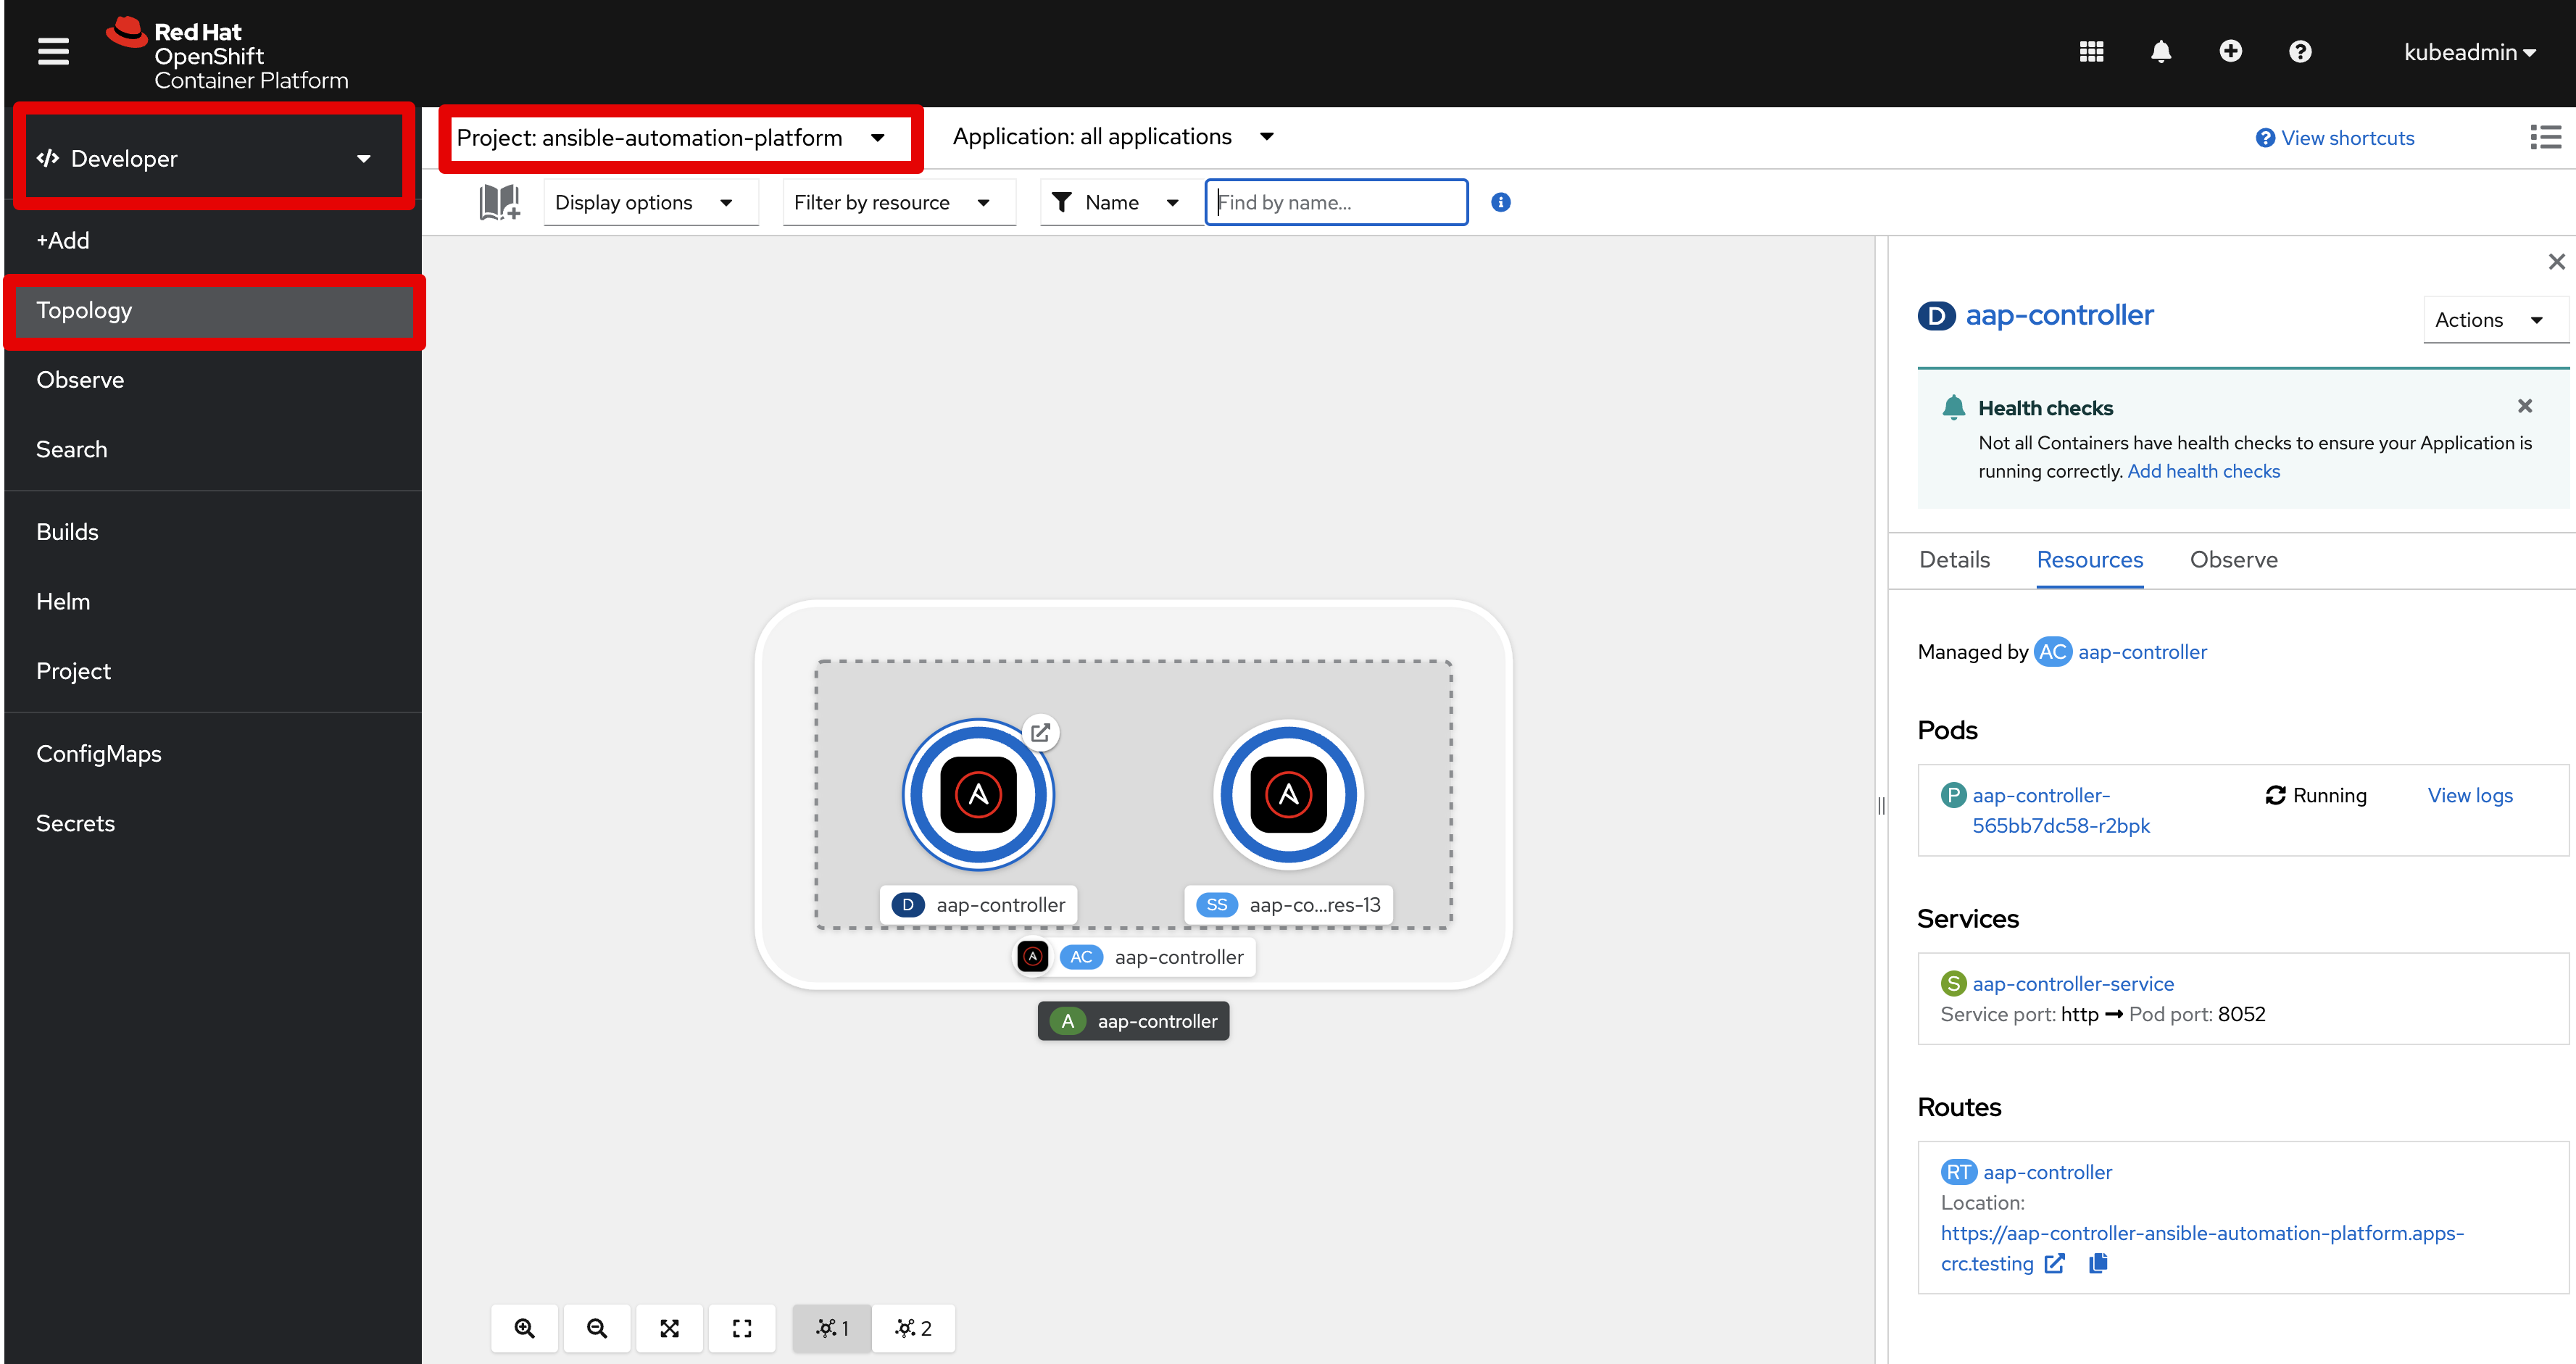
Topology
The Topology view in the Developer perspective of the web console provides a visual representation of all the applications within a project, their build status, and the components and services associated with them. It’s a very useful tool to become familiar with as you learn about AAP on OCP. Ensure you switch to Developer perspective (instead of Administrator that we have used so far) and you set the Project to ansible-automation-platform.
Containers
If you wish to take a look under the hood of the Ansible Automation Platform, go to the web console and navigate to Workloads -> Pods. Then drill down on a pod link and then scroll down to the Containers section to see the list of containers within that pod. Drill down on one of the containers to learn more information about things like Ports, Mounted Volumes, Environment Variables, CPU/Memory Resource Requests, Image source, and Pod IP Address.
Take it a step further by establishing a remote shell session to a container using these commands:
# Get list of containers for all pods in the ansible namespace
$ oc get pods -n ansible-automation-platform -o jsonpath='{range .items[*]}{"POD: "}{.metadata.name}{"\n containers: "}{.spec.containers[*].name}{"\n\n"}{end}'
POD: aap-controller-565bb7dc58-kl7dg
 containers: redis aap-controller-web aap-controller-task aap-controller-ee

POD: aap-controller-565bb7dc58-r2bpk
 containers: redis aap-controller-web aap-controller-task aap-controller-ee

POD: aap-controller-565bb7dc58-rmf4z
 containers: redis aap-controller-web aap-controller-task aap-controller-ee

POD: aap-controller-postgres-13-0
 containers: postgres

POD: aap-hub-api-7555475ccd-7qn66
 containers: api

POD: aap-hub-content-657cbb64bb-4pfc8
 containers: content

POD: aap-hub-content-657cbb64bb-ssh92
 containers: content

POD: aap-hub-postgres-13-0
 containers: postgres

POD: aap-hub-redis-5b7dcff876-fgsp7
 containers: redis

POD: aap-hub-web-84485b9644-ch27t
 containers: web

POD: aap-hub-worker-d9c9f86-qcgr2
 containers: worker

POD: aap-hub-worker-d9c9f86-v9sdb
 containers: worker

POD: automation-controller-operator-controller-manager-c88f859f768lw
 containers: kube-rbac-proxy automation-controller-manager

POD: automation-hub-operator-controller-manager-6fc656c8b-6bt5h
 containers: kube-rbac-proxy automation-hub-manager

POD: resource-operator-controller-manager-c75999d8b-7vhqt
 containers: kube-rbac-proxy platform-resource-manager

# Remote shell into a container: oc rsh -c <container> <pod>
$ oc rsh -c aap-controller-task aap-controller-565bb7dc58-r2bpk
sh-4.2$
Delete Operator, Controller and Hub
In some cases you might want to recreate the Automation Controller or Automation Hub instance and the good news is this is made incredibly simple. Follow these steps for truly any object created by the Operator.
If you additionally wish to delete the Operator itself, do so in the Operators -> Installed Operators area but ensure all objects created by the Operator are deleted first.
- Navigate within OpenShift web console to
Operators -> Installed Operators - Navigate to the proper tab for the object you want to delete, for example
Automation Hubtab - Existing instances are listed
- Select the 3-dots on the right side of the instance to expose a popup menu
- Select the
Deleteoption - Notice related objects in OpenShift (pods, secrets, pvc, etc) have been shutdown, destroyed and removed
Automation Analytics
Red Hat also offers Automation Analytics from their cloud console site. For more information on how you can leverage this as well as Red Hat Insights for reporting purposes read the following blog.
References
Some extra information and resources leveraged in this article.
For OpenShift:
- Product Documentation for Red Hat OpenShift Local
- Product Documentation for Red Hat Ansible Automation Platform
- Upstream Source Code
- OpenShift Admins Guide to jsonpath
- Introduction to “oc” — the OpenShift Command Line Power Tool
- opensource.com - A hands-on guide to images and containers for developers
- Operator Maturity Model
- Infrastructure Nodes in OpenShift 4
- On-Demand execution with Red Hat OpenShift
- What are Red Hat OpenShift Operators?
- Self-hosted Load Balancer for OpenShift: an Operator Based Approach by Raffaele Spazzoli
- Keepalived operator
For Ansible Platform:
